It looks like you're using an Ad Blocker.
Please white-list or disable AboveTopSecret.com in your ad-blocking tool.
Thank you.
Some features of ATS will be disabled while you continue to use an ad-blocker.
share:
I just downloaded Gimp 2.8 and am thrilled... everything in ONE window!!! Now I can actually get my bearings enough to start learning this stuff.
reply to post by Druid42
I've been watching you guys in the Avatar Creation thread play with animated avi's and wondered how it was done.
Thanks so much for the tutorial.........
Not now, but later I will experiment with the clouds in my avatar and see if I can get them to 'float'....LOL
Or maybe the leaves....not sure yet. Will have to play around with it first but atleast I have some kind of guide line.
Much respect~
snarky
reply to post by snarky412
It's how I've learned Gimp as well. I've had no "formal" education, I just tinker with settings, and figure out all the possibilities.
All the other settings? No clue.
Gimp is highly flexible, and the only way to learn is to tinker, and glean insight from others.
I'm interested to see what you come up with.
Agarta also has a slick technique to simplify things quite a bit.
Agarta? You gonna share your neat trick?
Agarta? You gonna share your neat trick?
reply to post by Druid42
The "Little trick" is that instead of "copy and Paste as new layer" simply drag the new layer you want from the right layers list and drop it on the new set of layers you want it on. It saves time and clicks.
The "Little trick" is that instead of "copy and Paste as new layer" simply drag the new layer you want from the right layers list and drop it on the new set of layers you want it on. It saves time and clicks.
Hey guys~
Just thought I'd drop by, say hello, and give this thread a bump............ **BUMP**
Respectfully~
snarky
Just thought I'd drop by, say hello, and give this thread a bump............ **BUMP**
Respectfully~
snarky
My first GIMP tutorial
This tutorial presumes a prerequisite knowledge of using individual images to create simple animate GIFs in the software program of your choosing. If you do not know how to make these, see Druid42’s great tutorial Here on how to make animations in GIMP.
The following steps will focus on creating individual image frames for an avatar animation that will precisely overlay and blend in with an existing background image.
The most common request I see is to makes someone’s eyes blink, squint or otherwise move, so I’ll show you how to do that for a simple example of the process. Once you learn the basics, you can create a wide variety of creative overlay animations.
Start by opening up a standard 180X480 background image in GIMP.
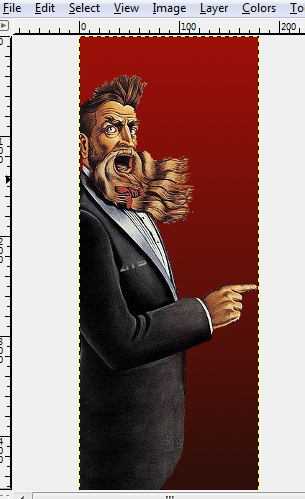
Now, you’ll need to carve out the area of the background that you will be working with to make your animated avatar. THIS IS THE MOST CRUCIAL STEP!!! If you don't get this right, the avatar and the background won't line up.
Using the “rectangle selection” tool, start the selection precisely at the coordinate for one of the following points, based on your custom title configuration…
example one-line custom title...
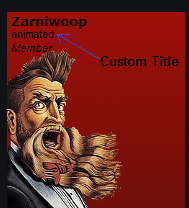
No custom title or one-line custom title: start at 4,57
Two line custom title: start at 4,71
Moderators: start at 4,69
Hover over the image with the rectangle selection tool until you are precisely on the appropriate coordinates described above, then click and drag the selection down and to the right until you see “170x240” at the bottom right of the window... then let go. It should go something like this...
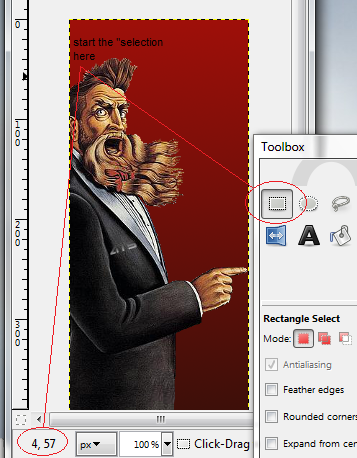
drag down and to the right...
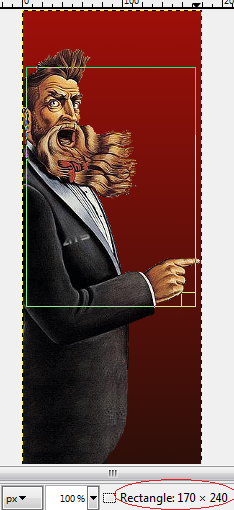
Now, copy that selection into memory. [CTRL-C]. You’ll paste it into a new window in a second.
Next, Open a new image [CTRL-N] with a transparent background.
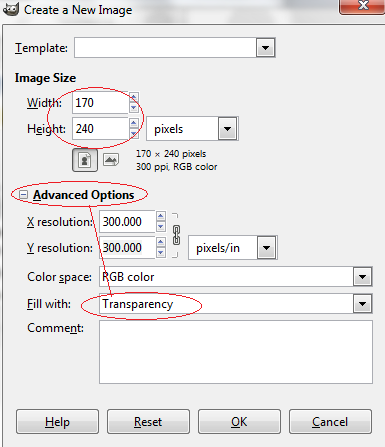
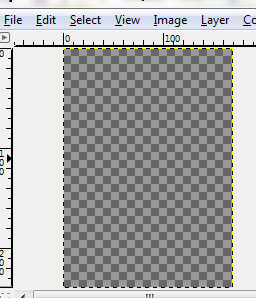
Then paste the contents of your selection in memory into the new image window [CTRL-V]. This will make it so the the background behind the image is transparent, which is important for the next steps.
This is your new “canvas” to work with for the overlay animated gif frames. Be careful not to move the image around at all during the rest of the process, as that will cause it to be out of alignment with your background.
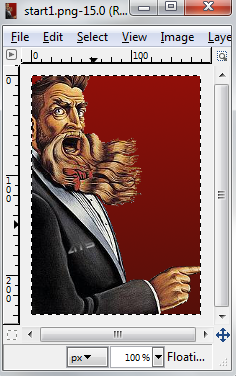
Next, you’ll want to erase everything but the section you want to alter and animate. Do this by using the “eraser” tool.
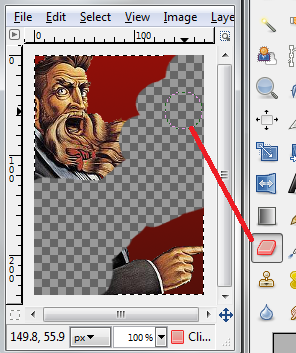
The more you erase, the smaller the file size is going to be. Since I’m only working with the eyes, here’s what it looks like after all the erasing is done…I could to even more, but it doesn't matter that much, as everything is going to line up perfectly.
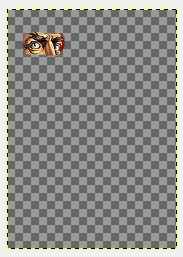
Next, you need to do whatever alterations you want. In this case, I'm just going to do do a simple eye blink.
I usually zoom in and work with the color picker tool and a simple small-pixel paint brush. But you can use the clone tool, free-select… whatever you are comfortable with to make your alterations.
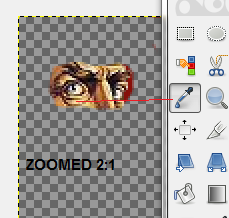
So, I ended up with this blinked eye…
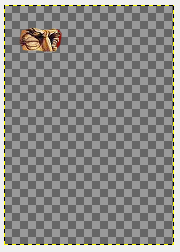
Once you are happy with the image, save it as a .gif and use it along with a transparent 170x240 .gif to create a simple 2-frame animation in your favorite program.
For my blinky eye, I used a 170x240 completely transparent gif as frame #1 and a .15-second delay on the image I just created in this example as frame #2 to create this animated gif that sits nicely over my background and blinks once every 5 seconds.

That's it!
This tutorial presumes a prerequisite knowledge of using individual images to create simple animate GIFs in the software program of your choosing. If you do not know how to make these, see Druid42’s great tutorial Here on how to make animations in GIMP.
The following steps will focus on creating individual image frames for an avatar animation that will precisely overlay and blend in with an existing background image.
The most common request I see is to makes someone’s eyes blink, squint or otherwise move, so I’ll show you how to do that for a simple example of the process. Once you learn the basics, you can create a wide variety of creative overlay animations.
Start by opening up a standard 180X480 background image in GIMP.

Now, you’ll need to carve out the area of the background that you will be working with to make your animated avatar. THIS IS THE MOST CRUCIAL STEP!!! If you don't get this right, the avatar and the background won't line up.
Using the “rectangle selection” tool, start the selection precisely at the coordinate for one of the following points, based on your custom title configuration…
example one-line custom title...

No custom title or one-line custom title: start at 4,57
Two line custom title: start at 4,71
Moderators: start at 4,69
Hover over the image with the rectangle selection tool until you are precisely on the appropriate coordinates described above, then click and drag the selection down and to the right until you see “170x240” at the bottom right of the window... then let go. It should go something like this...

drag down and to the right...

Now, copy that selection into memory. [CTRL-C]. You’ll paste it into a new window in a second.
Next, Open a new image [CTRL-N] with a transparent background.


Then paste the contents of your selection in memory into the new image window [CTRL-V]. This will make it so the the background behind the image is transparent, which is important for the next steps.
This is your new “canvas” to work with for the overlay animated gif frames. Be careful not to move the image around at all during the rest of the process, as that will cause it to be out of alignment with your background.

Next, you’ll want to erase everything but the section you want to alter and animate. Do this by using the “eraser” tool.

The more you erase, the smaller the file size is going to be. Since I’m only working with the eyes, here’s what it looks like after all the erasing is done…I could to even more, but it doesn't matter that much, as everything is going to line up perfectly.

Next, you need to do whatever alterations you want. In this case, I'm just going to do do a simple eye blink.
I usually zoom in and work with the color picker tool and a simple small-pixel paint brush. But you can use the clone tool, free-select… whatever you are comfortable with to make your alterations.

So, I ended up with this blinked eye…

Once you are happy with the image, save it as a .gif and use it along with a transparent 170x240 .gif to create a simple 2-frame animation in your favorite program.
For my blinky eye, I used a 170x240 completely transparent gif as frame #1 and a .15-second delay on the image I just created in this example as frame #2 to create this animated gif that sits nicely over my background and blinks once every 5 seconds.

That's it!
edit on 21-5-2013 by Zarniwoop because: (no reason given)
reply to post by Druid42
Thanks Druid. I'm hoping we can get some new recruits into the animation club
Thanks Druid. I'm hoping we can get some new recruits into the animation club
reply to post by snarky412
Very very nice job, easy to follow, step by step instructions. Thanks for adding.
Very very nice job, easy to follow, step by step instructions. Thanks for adding.
reply to post by Agarta
Thanks Agarta. It took a little longer than I thought it would, but it was fun at the same time... like to share, as i know you do as well.
Thanks Agarta. It took a little longer than I thought it would, but it was fun at the same time... like to share, as i know you do as well.
reply to post by Zarniwoop
Thank you for your time in putting this together....
[and Druids too...]
Got to get ready for work so won't have a chance to play until next week. [bummer...]
Until then, you guys have a great weekend...
[unless I can sneak time late tonight....]
Respectfully~
snarky
Thank you for your time in putting this together....
[and Druids too...]
Got to get ready for work so won't have a chance to play until next week. [bummer...]
Until then, you guys have a great weekend...
[unless I can sneak time late tonight....]
Respectfully~
snarky
reply to post by Agarta
Hi there friend, hope you are doing well.
I have a quick question...
I have been having a hard time with GIMP crashing on me here lately.
I've downloaded 3 times from different sites and found out I should rename a folder to help out.
Any how, I have not copy/pasted any of my brushes/themes due to the fact it crashes about every other day, so there is no extra material for it to open.
Question is ...is it my PC or is GIMP [2.8.6] unstable?
Not sure what to try next but is very frustrating to say the least.
Now I have several folders all renamed differently and not sure whether or not to delete them all and keep one.
Any suggestions, from any one, would help.
Thanks,
snarky
[Plus, I wanted to give this thread a bump....*BUMP*]
reply to post by snarky412
I'm using GIMP 2.8.4, and it's solid as a rock.
My recommendation is to completely un-install everything GIMP, then get that version, and see if you still have the same problem.
I'm using GIMP 2.8.4, and it's solid as a rock.
My recommendation is to completely un-install everything GIMP, then get that version, and see if you still have the same problem.
reply to post by snarky412
GIMP freezes up on me every now and then.... and then I lose stuff and have to reboot.
GIMP seems to be more than a bit needy with RAM. I recommend saving often and closing other programs while GIMPing
.
Question is ...is it my PC or is GIMP [2.8.6] unstable?
GIMP freezes up on me every now and then.... and then I lose stuff and have to reboot.
GIMP seems to be more than a bit needy with RAM. I recommend saving often and closing other programs while GIMPing
Druid42
reply to post by snarky412
I'm using GIMP 2.8.4, and it's solid as a rock.
My recommendation is to completely un-install everything GIMP, then get that version, and see if you still have the same problem.
Unfortunately, that's what I had to begin with.
So when it crashed, and I downloaded another, it was 2.8.6
All it does is crash over and over, even when I went to another site to get the DL
Will do as you suggest and just start all over.
TY~
snarky
Hey kind folks!
Just wanted to give this thread another *bump* going into the new year
Hope everyone is doing okay
Much respect~
snarky
Just wanted to give this thread another *bump* going into the new year
Hope everyone is doing okay
Much respect~
snarky
reply to post by snarky412
Very well thank you, I hope you are the same.
I apologize for not getting back to you sooner but here is the answer I have for you. I had the same problem for quite a while at one point in time. I re downloaded, I replaced, I deleted and tried a few more times, for as you know it's my apoc(art program of choice lol) I found out it was all in vain as it is not gimps fault per ce' , nor your computers, but, it is your OS. Gimp relies on the OS to run and if they update and the current gimp you have does not recognize it it will crash, freeze up, etc. etc. etc. The only things you can do is downgrade the upgrade to your OS or wait until gimp updates with a fix. I hope this helps.
edit on 15-1-2014 by Agarta because: sp
new topics
-
Just spotted an unusual aircraft Melbourne Australia
Aliens and UFOs: 7 hours ago
top topics
-
Mass Shooting Towson, Maryland - 7 shot, 1 possibly dead
Social Issues and Civil Unrest: 15 hours ago, 6 flags -
The truth lets admit it
Aliens and UFOs: 12 hours ago, 6 flags -
Just spotted an unusual aircraft Melbourne Australia
Aliens and UFOs: 7 hours ago, 5 flags
active topics
-
The truth lets admit it
Aliens and UFOs • 39 • : crayzeed -
Was Biden's Mass clemency and pardons one last cash grab?
US Political Madness • 8 • : gortex -
Trump Cancel trip to New Jersey because of drones
Aliens and UFOs • 65 • : WeMustCare -
The Mystery Drones and Government Lies --- Master Thread
Political Conspiracies • 124 • : WeMustCare -
New job to help stop school shootings
Social Issues and Civil Unrest • 27 • : xuenchen -
Elon Musk has Meeting with Nigel Farage at Mar-a-Lago
Regional Politics • 8 • : angelchemuel -
Labour Plotting to Postpone May's Council Elections ?
Regional Politics • 11 • : angelchemuel -
School shooting in Madison Wi.
Social Issues and Civil Unrest • 70 • : IndieA -
Mood Music Part VI
Music • 3739 • : Hellmutt -
Post A Funny (T&C Friendly) Pic Part IV: The LOL awakens!
General Chit Chat • 7922 • : PinkFreud
