It looks like you're using an Ad Blocker.
Please white-list or disable AboveTopSecret.com in your ad-blocking tool.
Thank you.
Some features of ATS will be disabled while you continue to use an ad-blocker.
share:
As the title says, I'd like this thread to be a collaborative effort by all ATS members who use Gimp. Most people are intimidated by creating
graphics, often frustrated, but would like to learn. The best way to accomplish that would by reading tutorials, which I have, but there's always
something I wonder about.
Personally, I can scale images, crop them to different sizes, and make animations. That means that there are three simple tutorials that I can make. The idea is to cover the basics, but also add more complex techniques, such as drop shadow, beveling, etc., you get the idea.
Why choose Gimp? It's free. It's a darn nifty program, and has thousands of plugins. (Hint: adding specific plug-ings is another tutorial.) I just learned how last night to add in other fonts, other than the stock ones, which gives me unlimited freedom now. (Another tutorial.) I'd like to learn more, and I'm sure others would too, and I'd like your help.
Why not Photoshop? It's the price factor. I'd also like to think that you can do anything in Gimp that you can with Photoshop. Besides, I'm all about open source.
Official Gimp Website. There is a version for Windows, Mac, and Linux. I'd suggest you grab a copy, and join in the fun.
Of course, this thread was inspired by the Avatar Creations Thread, and the Avatar Creations Logo Contest. Please visit those threads and see some of the awesome ATS produced graphics.
Feel free to add in your own tutorial, comment, or tinker with Gimp as you read along. Enjoy!
Here's a list of available Gimp tutorials, with thanks to Agarta for preparing the list:
- Basic Gimp Layout
Basic Layout part 2
Basic Resize
Basic Resize part 2
Basic Background Removal
Background Creation with Merging
Background Creation with Merging part 2
Prespective and Shaping
Themes
Installing and Using Text Effects: Glass Text
Text Along a Path
edit on Tue Jan 8 2013 by DontTreadOnMe
because: (no reason given)
I just got GIMP and I am very interested in learning to use it. Do you plan on making an animated GIF tutorial?
Been using Gimp for years for special effects.
Does most everything you need without spending the bucks.
I love it
Does most everything you need without spending the bucks.
I love it
GIMP: The free photoshop for the masses!
I used to use GIMP a lot on my MB Pro...but since I upgraded to the newest OS it won't work anymore. Something about X11 ... IDK.
GIMP is a wonderful too, and combined with imgur to upload photos...
Winning!
I used to use GIMP a lot on my MB Pro...but since I upgraded to the newest OS it won't work anymore. Something about X11 ... IDK.
GIMP is a wonderful too, and combined with imgur to upload photos...
Winning!
reply to post by DarthMuerte
Yes, of course. I installed a screen capture applet on my system, so I will be snatching bits and pieces to post.
I may have one up tonight, a simple animation, three frames, with different time delays. From there, you can make however many frames you like, and add in whatever speed you want.
Yes, of course. I installed a screen capture applet on my system, so I will be snatching bits and pieces to post.
I may have one up tonight, a simple animation, three frames, with different time delays. From there, you can make however many frames you like, and add in whatever speed you want.
reply to post by MystikMushroom
I'm running Mint 13, very much worth it. Has the latest version installed.
I'm running Mint 13, very much worth it. Has the latest version installed.
reply to post by Zarniwoop
Then I should expect a mini-tutorial from you in the future? Or two?
If I ask a question about Gimp, you'd be able to point my through the technique?
Awesome!
Then I should expect a mini-tutorial from you in the future? Or two?
If I ask a question about Gimp, you'd be able to point my through the technique?
Awesome!
reply to post by Druid42
Hi Druid - your thread is a proverbial lifesaver. I do have GIMP (2.8) but am still in the process of learning it as computer graphics and the likes thereof is something that I have only very recently become involved in.
I'm really excited.
Zarniwoop for instance belts out some awesome stuff. Agarta is a wizard. Kinglizard is another legend, Big Fat Fury Texan is another, Im a Marty and the list could go on.
Will give this thread a plug at avatar creations whenever I see fit.
S&F mate - great great stuff indeed!
So let's start with the Basics:
You boot up Gimp for the first time, and this is what you see, in the center.....
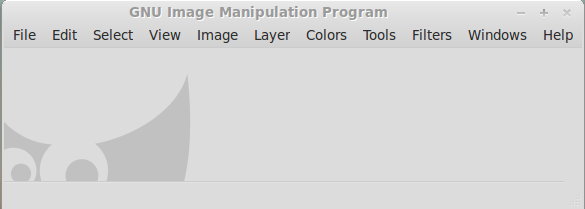 The Main Window.
Off to the left, you see......
 The Toolbar.
Off to the right, you see.....
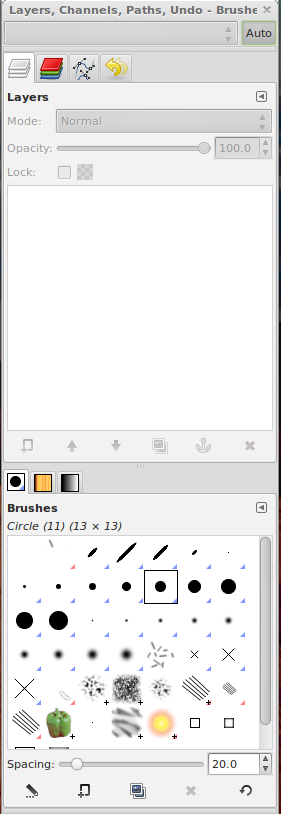 The Layer Menu.
Those three elements I posted so other members can use them in their tutorials. Just reference (copy and paste) the particular menu bar you are talking about, and tell us which item to click. It seems the simplest way.
You boot up Gimp for the first time, and this is what you see, in the center.....

Off to the left, you see......

Off to the right, you see.....

Those three elements I posted so other members can use them in their tutorials. Just reference (copy and paste) the particular menu bar you are talking about, and tell us which item to click. It seems the simplest way.
reply to post by Sublimecraft
I am in the same boat as you, (pun intended!) with a small amount of knowledge about Gimp, but the desire to learn, and tired of scanning through tutorials. It's better to ask the "pros" personally.
In fact, I think someone here will be able to answer any question we ask of them.
I am in the same boat as you, (pun intended!) with a small amount of knowledge about Gimp, but the desire to learn, and tired of scanning through tutorials. It's better to ask the "pros" personally.
In fact, I think someone here will be able to answer any question we ask of them.
reply to post by Druid42
Thanks for the heads up, I'll stick with OSX for now
Never been a Linux guy. I'm to lazy to figure it out!
Thanks for the heads up, I'll stick with OSX for now
Never been a Linux guy. I'm to lazy to figure it out!
reply to post by MystikMushroom
You could try getting the latest, and re-installing. Let me know how it goes.
You could try getting the latest, and re-installing. Let me know how it goes.
I hate GIMP. Photoshop is not considered user friendly by many, but I think GIMP is even less user friendly. Still, the price of Photoshop is
outrageous. I can deal.
There are also several websites with gimp tutorials as well. Just google "gimp tutorial" and you'll get a good sized list.
Here are some of them, the first is from gimp itself
www.gimp.org...
gimp-tutorials.net...
Here are some of them, the first is from gimp itself
www.gimp.org...
gimp-tutorials.net...
Can anyone state, then, what are a layer, path and channel exactly? (right hand window)
Great idea! I need photoshop myself, I use features that GIMP doesn't have as far as I know. I hand paint A LOT, and I have found nothing that
compares to the mixer brush for that. I also use smart objects a lot, and things like puppet warp.
lol...I have GIMP. I can do 3 things with it...open program, close program, re-size picture (sometimes).
I would love to have some basic graphic skills
J
I would love to have some basic graphic skills
J
Mini-tutorial:
Re-sizing a pic to avatar size.
I'll use a wolf for this example. (I like wolves, what can I say?)
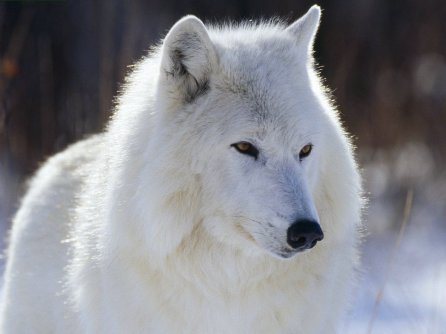
I found that pic on the web somewhere, it's a Baffin Island wolf, and an endangered species. I'd like to have it for my avatar. It needs resized. Ok, here we go.....
We can do all this from the main window.

I already used File, and Open, and loaded the pic in Gimp. Next go to Image, and then Canvas Size.
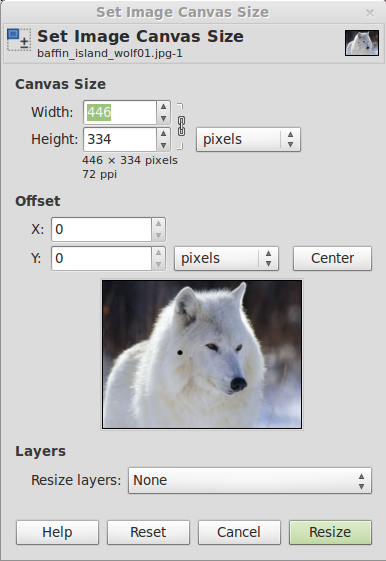
Notice the Height value is 334. Avatar backgrounds are 180 x 480, so we want to change the height value to 480. Between the Width and Height boxes, off to the immediate right, is a chain looking thingy. It's called the Constrain button. Click it a couple times, to see how it works. Leave it open, meaning unconstrained, and Gimp will only change the Height value. Click the Resize tab, bottom right.
Your image is now 480 tall, but not 180 wide. We'll have to crop the main image to keep perspective.
Go back to Image, and click Canvas Size again.
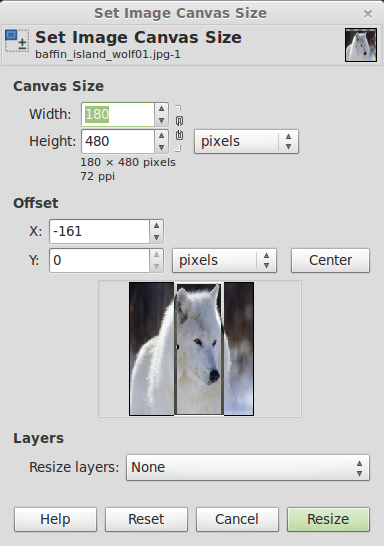
Click the Constrain Button (open chain), then change the Width value to 180. Under that is the Offset function. Off to the right is the CENTER box. Click that, and it'll create a window that shows the final size of your image. At this point, you can move the pic around behind the box, and when you have the pic you want, click Resize.
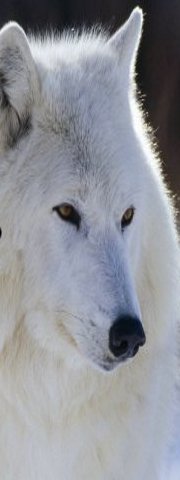
From here, go to file, save as, type a file name, then export, and save. Upload to your ATS uploads. Enjoy.
Re-sizing a pic to avatar size.
I'll use a wolf for this example. (I like wolves, what can I say?)

I found that pic on the web somewhere, it's a Baffin Island wolf, and an endangered species. I'd like to have it for my avatar. It needs resized. Ok, here we go.....
We can do all this from the main window.

I already used File, and Open, and loaded the pic in Gimp. Next go to Image, and then Canvas Size.

Notice the Height value is 334. Avatar backgrounds are 180 x 480, so we want to change the height value to 480. Between the Width and Height boxes, off to the immediate right, is a chain looking thingy. It's called the Constrain button. Click it a couple times, to see how it works. Leave it open, meaning unconstrained, and Gimp will only change the Height value. Click the Resize tab, bottom right.
Your image is now 480 tall, but not 180 wide. We'll have to crop the main image to keep perspective.
Go back to Image, and click Canvas Size again.

Click the Constrain Button (open chain), then change the Width value to 180. Under that is the Offset function. Off to the right is the CENTER box. Click that, and it'll create a window that shows the final size of your image. At this point, you can move the pic around behind the box, and when you have the pic you want, click Resize.

From here, go to file, save as, type a file name, then export, and save. Upload to your ATS uploads. Enjoy.
reply to post by jaymp
The OP of this thread is to help make Gimp more user friendly. I hope you learn something.
The OP of this thread is to help make Gimp more user friendly. I hope you learn something.
new topics
-
Half-Life 2 is 20 Years Old - its Also Free on Steam until the 18th
Video Games: 3 hours ago -
Does the Trump win mean No More Taylor Swift??
Politicians & People: 7 hours ago -
Trump-appointed judge blocks Biden administration overtime rule
Social Issues and Civil Unrest: 9 hours ago
top topics
-
Don't cry do Cryo instead
General Chit Chat: 14 hours ago, 12 flags -
Does the Trump win mean No More Taylor Swift??
Politicians & People: 7 hours ago, 12 flags -
Trump-appointed judge blocks Biden administration overtime rule
Social Issues and Civil Unrest: 9 hours ago, 7 flags -
Tariffs all around, Except for ...
Dreams & Predictions: 16 hours ago, 6 flags -
Half-Life 2 is 20 Years Old - its Also Free on Steam until the 18th
Video Games: 3 hours ago, 1 flags
active topics
-
Mike Tyson returns 11-15-24
World Sports • 67 • : argentus -
WATCH LIVE: US Congress hearing on UFOs, unidentified anomalous phenomena
Aliens and UFOs • 97 • : putnam6 -
The art of being offended
Social Issues and Civil Unrest • 52 • : argentus -
Does the Trump win mean No More Taylor Swift??
Politicians & People • 44 • : Oldcarpy2 -
Mood Music Part VI
Music • 3703 • : underpass61 -
Old School Punk
Music • 560 • : underpass61 -
Don't cry do Cryo instead
General Chit Chat • 9 • : Myhandle -
President-Elect DONALD TRUMP's 2nd-Term Administration Takes Shape.
Political Ideology • 207 • : EyeoftheHurricane -
Thanksgiving 2024
Member Art • 20 • : argentus -
Trump-appointed judge blocks Biden administration overtime rule
Social Issues and Civil Unrest • 7 • : NoCorruptionAllowed
