It looks like you're using an Ad Blocker.
Please white-list or disable AboveTopSecret.com in your ad-blocking tool.
Thank you.
Some features of ATS will be disabled while you continue to use an ad-blocker.
share:
This is a simple process for resizing and implementing your mini-profile background image using Microsoft Paint. It is meant to provide an easy method
to re-size these images so that they do not repeat in the user profile space.
Summary:
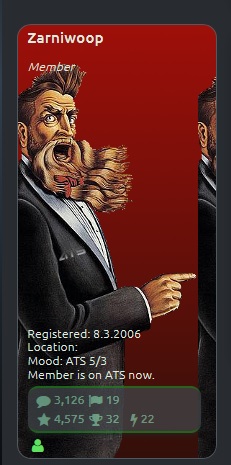
With the advent of ATS 5/3 site release, the new space for profile background images is wider than before, causing the older images to repeat in the new, larger space. Like this…
Details:
The new width for mini-profile background images is 200 pixels. The length varies based on the viewer’s screen size and other profile factors. For the majority of profiles, a length of 450 will avoid making image repeat at the bottom of the profile space. Images longer than 450 pixels will simply be cut off at the bottom (which is better than repeating)
If you want to skip this process or you have trouble with any of the steps below, please post to this thread, Avatar Creations and someone will help you out. Otherwise, read on.
Section I - Re-sizing your background image
1. Open your profile image in Microsoft Paint
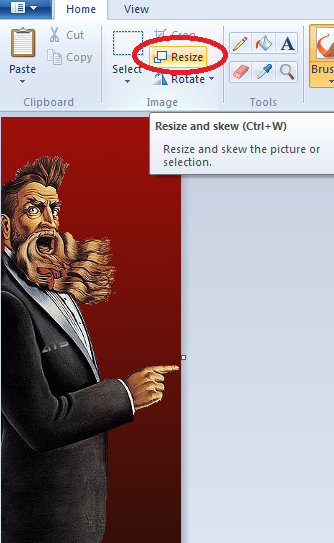
2. From the “Home” tab, click on “resize”
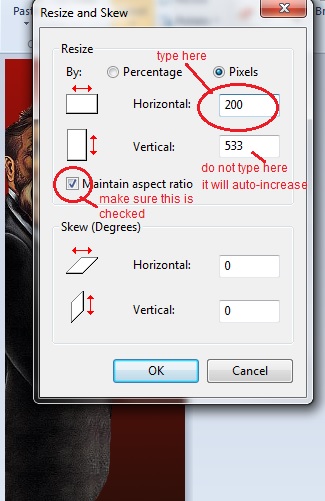
- Select the “Pixels” radio button
- Make sure that the “maintain aspect ratio” box is checked
- Type “200” into the “Horizontal” Box (the “Vertical” value will automatically increase with respect to the aspect ratio.
- Hit "OK"
It’s OK if your image is longer than 450 pixels. If you want further optimization, please go to the Avatar Creations thread for assistance.
6. Select “File”, “Save As” [choose a file name]
Next, you’ll need to upload the image to your upload space on ATS.
Section II -How to upload and implement your mini-profile background image.
1. On your top ATS menu, click on the little circle with the down arrow to open the lower menu, then click on “Upload”

2. When your Uploads page loads, click the little cloud with the up arrow

3. Click “Select Files” … this will bring up a dialog box where you can choose the file to upload from your PC. Select the file you want to use, then click on "Open"
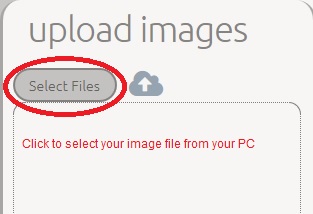
4. When the file name you selected shows up, click the little cloud to upload it to your ATS upload space.
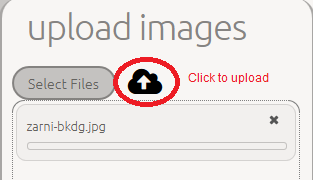
5. In a few seconds, your image should appear as a thumbnail. Click on it.

6. Final step… Click on the little square to make the image your new mini-profile background.
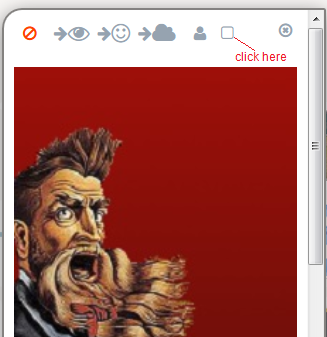
NOTE: Do not click on the little person icon to the left of the square, or your big background image will go into your avatar space and replace your transparent .gif avatar. If this happens, read on to the next section...
Section III - Troubleshooting
1. Go to a thread you have posted on and see what your profile looks like. If it looks like this one below, you put your mini-profile image in the “Avatar” space by mistake.
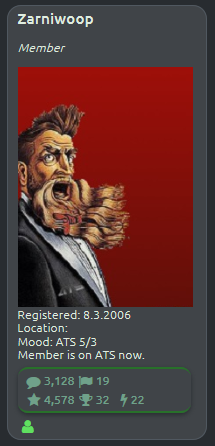
To fix this, just go back to step 6 above and put it in the background space.
2. If your background image looks too short, like this…
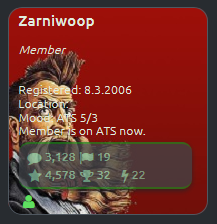
...you don’t have a transparent .gif Avatar in your avatar space. You need this in place to "push down" the profile text and allow for the large background image. If this is the case, follow the steps below to put a transparent avatar in place
a. Go to your "Account" page.

b. In the “Your Avatar” area and in the “default ATS avatar” box, enter the following text (copy/paste), but be sure to remove the space after the http: before you hit "Submit"
http: //files.abovetopsecret.com/files/img/ev522a6803.gif
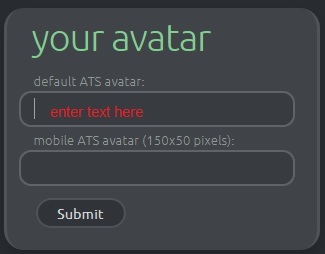
c. Hit “Submit”
This should put your transparent avatar in place to maximize your profile background image.
Further Troubleshooting needed? - Go to the Avatar Creations thread. There's a bunch of friendly folks standing by ready to assist.
Summary:
With the advent of ATS 5/3 site release, the new space for profile background images is wider than before, causing the older images to repeat in the new, larger space. Like this…

Details:
The new width for mini-profile background images is 200 pixels. The length varies based on the viewer’s screen size and other profile factors. For the majority of profiles, a length of 450 will avoid making image repeat at the bottom of the profile space. Images longer than 450 pixels will simply be cut off at the bottom (which is better than repeating)
If you want to skip this process or you have trouble with any of the steps below, please post to this thread, Avatar Creations and someone will help you out. Otherwise, read on.
Section I - Re-sizing your background image
1. Open your profile image in Microsoft Paint
2. From the “Home” tab, click on “resize”

- Select the “Pixels” radio button
- Make sure that the “maintain aspect ratio” box is checked
- Type “200” into the “Horizontal” Box (the “Vertical” value will automatically increase with respect to the aspect ratio.
- Hit "OK"

It’s OK if your image is longer than 450 pixels. If you want further optimization, please go to the Avatar Creations thread for assistance.
6. Select “File”, “Save As” [choose a file name]
Next, you’ll need to upload the image to your upload space on ATS.
Section II -How to upload and implement your mini-profile background image.
1. On your top ATS menu, click on the little circle with the down arrow to open the lower menu, then click on “Upload”

2. When your Uploads page loads, click the little cloud with the up arrow

3. Click “Select Files” … this will bring up a dialog box where you can choose the file to upload from your PC. Select the file you want to use, then click on "Open"

4. When the file name you selected shows up, click the little cloud to upload it to your ATS upload space.

5. In a few seconds, your image should appear as a thumbnail. Click on it.

6. Final step… Click on the little square to make the image your new mini-profile background.

NOTE: Do not click on the little person icon to the left of the square, or your big background image will go into your avatar space and replace your transparent .gif avatar. If this happens, read on to the next section...
Section III - Troubleshooting
1. Go to a thread you have posted on and see what your profile looks like. If it looks like this one below, you put your mini-profile image in the “Avatar” space by mistake.

To fix this, just go back to step 6 above and put it in the background space.
2. If your background image looks too short, like this…

...you don’t have a transparent .gif Avatar in your avatar space. You need this in place to "push down" the profile text and allow for the large background image. If this is the case, follow the steps below to put a transparent avatar in place
a. Go to your "Account" page.

b. In the “Your Avatar” area and in the “default ATS avatar” box, enter the following text (copy/paste), but be sure to remove the space after the http: before you hit "Submit"
http: //files.abovetopsecret.com/files/img/ev522a6803.gif

c. Hit “Submit”
This should put your transparent avatar in place to maximize your profile background image.
Further Troubleshooting needed? - Go to the Avatar Creations thread. There's a bunch of friendly folks standing by ready to assist.
edit on 10.7.2013 by Zarniwoop because: (no reason given)
Wonderful and useful thread. Doesn't help me as I cannot use 'paint' lol But I can get all the help I need on the Avatar Creations Thread, so
I am good to go.
edit on 7-10-2013 by Iamschist because: spastic today
reply to post by Iamschist
I thought about doing one in GIMP, but then decided anyone who knows how to use GIMP would know how to re-size their avatar
Doesn't help me as I cannot use 'paint' lol
I thought about doing one in GIMP, but then decided anyone who knows how to use GIMP would know how to re-size their avatar
reply to post by Zarniwoop
Great thread
Do you mind if I add it as a helpful link to the Avatar upload instructions: ATS.5/3?
There's already a link to the Avatar Creations thread there too.
Great thread
Do you mind if I add it as a helpful link to the Avatar upload instructions: ATS.5/3?
There's already a link to the Avatar Creations thread there too.
edit on 7-10-2013 by Casandra because: Fixed link
reply to post by Casandra
Thanks... Please go right ahead!
I didn't see your thread previously, but I like it
Thanks... Please go right ahead!
I didn't see your thread previously, but I like it
Nice set of instructions Zarni.
You deserve a bottle of 300 year old scotch. Sadly I don't have any to send you!
S&F for being your usual helping self.
P
You deserve a bottle of 300 year old scotch. Sadly I don't have any to send you!
S&F for being your usual helping self.
P
i love people helping people. Its the way things should always be.
OMG! That was sooo confusing. I'm just getting used to Paint.
I'll try it again, following your directions.
Great tut, Zarni!
I'll try it again, following your directions.
Great tut, Zarni!
Oh wow this is totally helpful , I've been trying to figure out why the images I uploaded won't become my avatars and background images, thank you
Thank You! I just placed my first avatar after joining 3 yrs ago. It took me a
long time (a few hrs) but I finally figured it out. I hope I can continue to learn so I can
get fancier & not just copy & post a bloody picture.
Cheers
Ektar
long time (a few hrs) but I finally figured it out. I hope I can continue to learn so I can
get fancier & not just copy & post a bloody picture.
Cheers
Ektar
Ektar
Thank You! I just placed my first avatar after joining 3 yrs ago. It took me a
long time (a few hrs) but I finally figured it out. I hope I can continue to learn so I can
get fancier & not just copy & post a bloody picture.
Cheers
Ektar
well, you have started out excellently.
If you ever want help, come to Avatar creations. we make stuff for members (for free), and have a community where we share tips/tricks/other stuff. you can find it here: www.abovetopsecret.com...
reply to post by bigfatfurrytexan
Thank you sir, I have been trying to check it out.
I am really enjoying the Holiday Competition!
Cheers
Ektar
Thank you sir, I have been trying to check it out.
I am really enjoying the Holiday Competition!
Cheers
Ektar
thankies for this. i would give it two stars, if i could, ehe. i don't know if i want this to be my permanent avvie, but it's a self portrait i made
on my d.a., and i hope it's nice to look at.
c:
yea! i don't see this said enough, so i liked it and starred it.
X3
c:
i love people helping people. Its the way things should always be.
yea! i don't see this said enough, so i liked it and starred it.
X3
I hope you forgive me for practicing here on your thread.
I'd like to see how switching the BG pic looks like.
Thanks.
I'd like to see how switching the BG pic looks like.
Thanks.
I have tried this, step by step, 14 times and still can't get it right!!!
I am, seriously, ready to put my fist through my monitor.
[ thinks to self ] "walk away David.....walk away. Breathe. Go get another cup of coffee."
NOW 15.
I am, seriously, ready to put my fist through my monitor.
[ thinks to self ] "walk away David.....walk away. Breathe. Go get another cup of coffee."
NOW 15.
edit on 11-3-2016 by DAVID64 because: (no reason given)
a reply to: DAVID64
Looks like you did it!
I put my new one in the avatar creations thread and they resized it for me perfectly.
The animals (that I love) would keep being hidden behind my "stats" (not sure why they are important but I digress).
Just wanted to say one of those way smarter than I will ever be people came right along and helped me out in like 5 minutes, I think...
new topics
-
UK and Europe Floods
Rant: 1 hours ago -
FEMA kicks hurricane survivors out of temporary housing into snowstorm and freezing temperatures
Disaster Conspiracies: 2 hours ago -
Failures of leadership on display
US Political Madness: 2 hours ago -
Power grid faults surged right before Los Angeles wildfires began
Mainstream News: 2 hours ago -
Tustin California Military equipment stolen BIG equipment .
Social Issues and Civil Unrest: 2 hours ago -
PALES-TINE, PALES-ADES and the Australian Aboriginal "Lightning Man"
Dreams & Predictions: 3 hours ago
top topics
-
FEMA kicks hurricane survivors out of temporary housing into snowstorm and freezing temperatures
Disaster Conspiracies: 2 hours ago, 13 flags -
Tustin California Military equipment stolen BIG equipment .
Social Issues and Civil Unrest: 2 hours ago, 12 flags -
Failures of leadership on display
US Political Madness: 2 hours ago, 11 flags -
How To Spot Fake U.F.O. Photos
Aliens and UFOs: 14 hours ago, 8 flags -
Scary video of face in an abandoned house
Paranormal Studies: 16 hours ago, 6 flags -
Power grid faults surged right before Los Angeles wildfires began
Mainstream News: 2 hours ago, 6 flags -
UK and Europe Floods
Rant: 1 hours ago, 6 flags -
PALES-TINE, PALES-ADES and the Australian Aboriginal "Lightning Man"
Dreams & Predictions: 3 hours ago, 5 flags
active topics
-
Los Angeles brush fires latest: 2 blazes threaten structures, prompt evacuations
Mainstream News • 413 • : marg6043 -
Failures of leadership on display
US Political Madness • 10 • : NoCorruptionAllowed -
UK and Europe Floods
Rant • 1 • : angelchemuel -
Tustin California Military equipment stolen BIG equipment .
Social Issues and Civil Unrest • 6 • : Mantiss2021 -
To become president, Zelensky had to learn Ukrainian
Political Conspiracies • 49 • : Oldcarpy2 -
Labour Plotting to Postpone May's Council Elections ?
Regional Politics • 23 • : gortex -
FEMA kicks hurricane survivors out of temporary housing into snowstorm and freezing temperatures
Disaster Conspiracies • 8 • : network dude -
LA Mayor Bass Demanded $49M in Additional LAFD Cuts One Week Before Wildfires
Mainstream News • 28 • : marg6043 -
Power grid faults surged right before Los Angeles wildfires began
Mainstream News • 4 • : Mantiss2021 -
Post A Funny (T&C Friendly) Pic Part IV: The LOL awakens!
General Chit Chat • 8017 • : angelchemuel
