It looks like you're using an Ad Blocker.
Please white-list or disable AboveTopSecret.com in your ad-blocking tool.
Thank you.
Some features of ATS will be disabled while you continue to use an ad-blocker.

A must read for Jerky Lovers, a homemade dehydrator!
page: 1share:
One of the basic requirements for survivalists is to know how to preserve food. This goes for jerky (any meat), fruits, veggies, and herbs. A
dehydrator is one of the most basic methods to dry foods, yet they are typically a big investment, messy to clean, heavy, and you typically have to
turn your items during the drying process.
After researching the interwebs for the best commercial dehydrator, I started researching DIY dehydrators, again, an investment in tools and hardware. I then decided to build my own, as cheaply and easily as possible. Here's what I came up with. It's powered by a small 13x11 generic room heater, 800 watt power consumption, easily removed for other uses when the dehydrator is not in use:
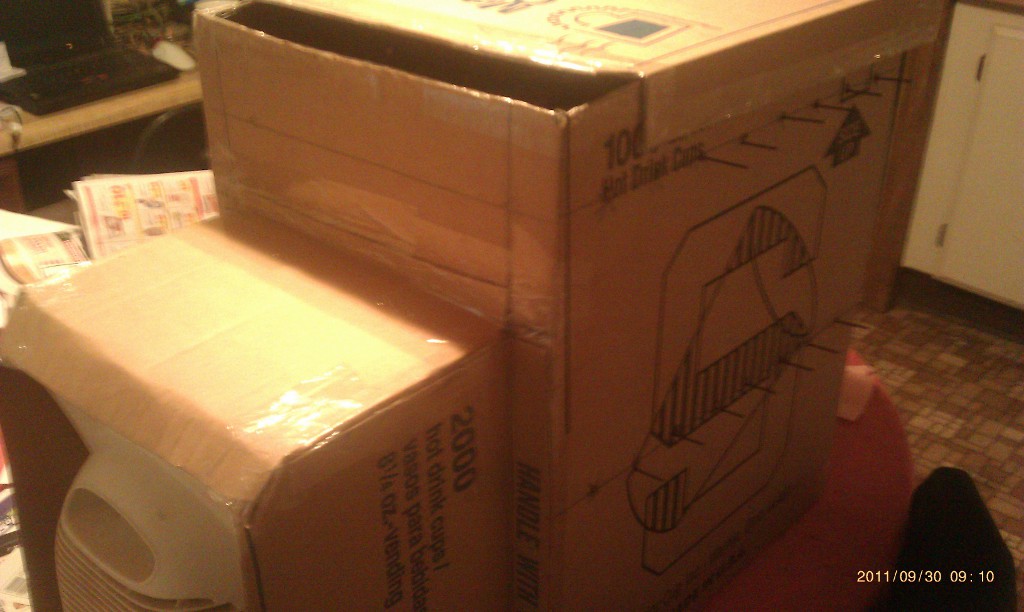
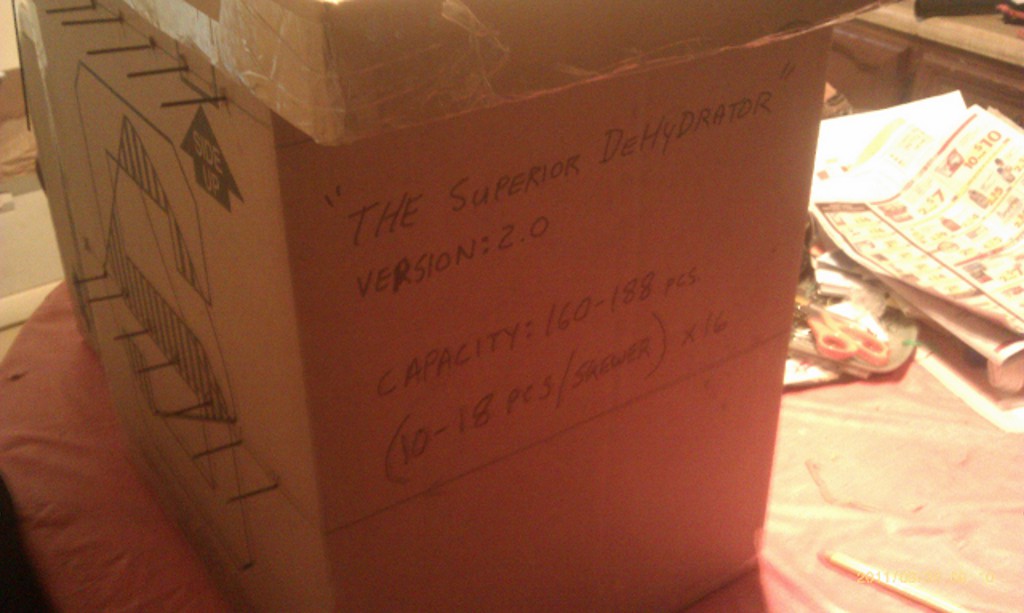
My first version would dry jerky in 4-5 hours, and after MANY batches of jerky, I decided to make new version, with a few design changes. This model is 27" long, 15" wide, and 21" tall. Yes, it is made out of two cardboard boxes. It's lightweight, and highly portable. To make your own, you only need cardboard and 2" clear packing tape, and a sharp knife. No hammers or nails required. Version one of my dehydrator only held 14 skewers total, this model has 16, with a total capacity of 160-188 pieces of jerky, depending if you fit 10-18 pieces of whatever you are drying, and how you space it.
The lid slides back and forth, adjustable to whatever air flow you desire. The most important thing about drying foods and herbs is temperature regulation. You want the temp to stay in the 120-160 degree range, otherwise the food cooks, so ventilation is how you regulate temperature. With the lid cracked open this far, the temp stays at a constant 135 degrees F. I have a float able thermometer I also use for brewing my own beer, so it doubles as the temperature gauge, hung inside with a small piece of "s" curved coat hanger.

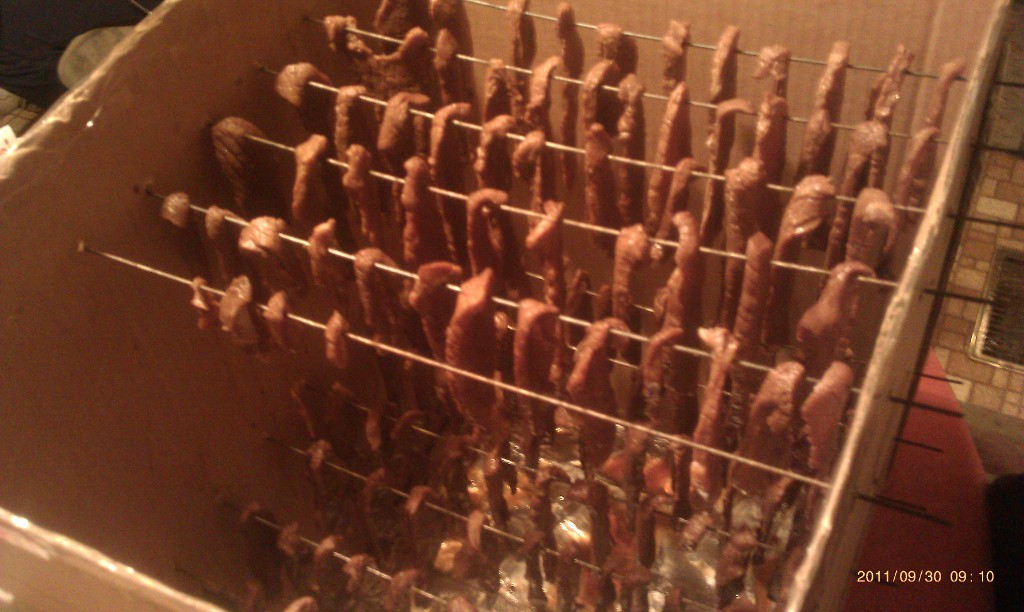
The hanging method of drying meat eliminates the need to touch or flip your pieces around so they dry evenly. Notice the even spacing between jerky pieces. This allow even air circulation, and the jerky dries uniformly from all sides. The skewers are simply straight 12 gauge wire, cut two inches over the width of the box. You load a skewer up, place the skewer inside from the top, fitting it in one side before the other, and then space your jerky accordingly. The batch I am doing now was 5 pounds of beef, which will dry out to about 3 pounds of dried jerky, so you can see I am still under capacity. I am using 13 of my 16 skewers, so I could've done a 6-7 pound batch easily.
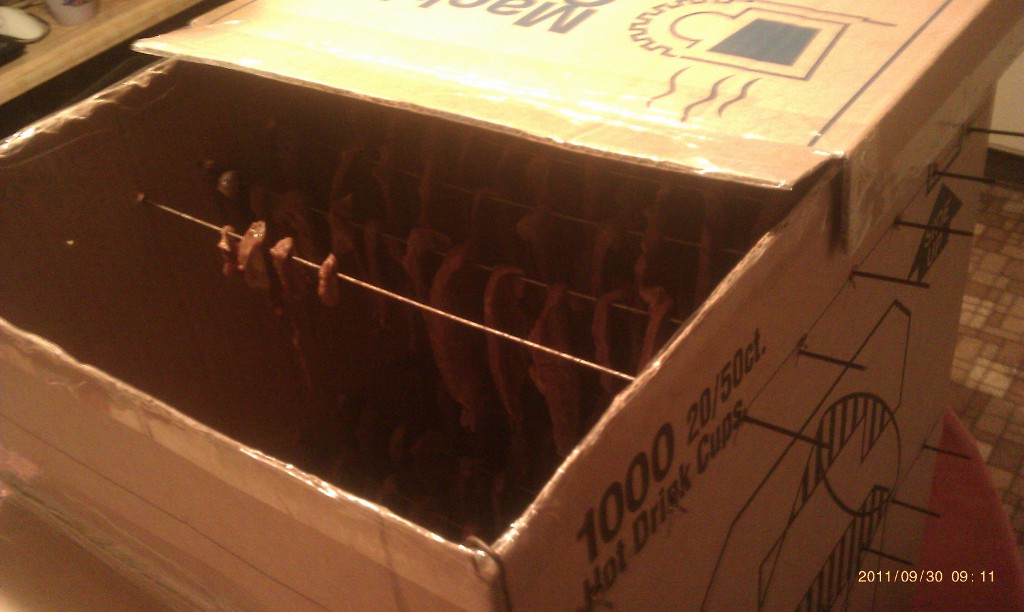
Notice the Aluminum foil pan at the bottom. This simple innovation catches all the drippings, and when you are done drying a batch of jerky, you simply fold the foil inwards upon itself to contain any sticky goo, throw it away, and place a new foil sheet for the next batch. Virtually no clean-up! Of course I know you ATSers don't want to give up your tinfoil hats, but it's a necessary expense. You have to clean your skewers, and change foil. You put the box in a closet or on a shelf, and it sits until the next time you use it. How much easier is it than that? Oh, and the smell jerky makes while drying, Heavenly!
So let's crunch a few numbers. Commercial jerky is $16.99 USD as a rough estimate. I'm making about 3 pounds, so this batch would cost about $51.00 USD.
I spent $14.00 on meat, plus the ingredients, so my grocery bill was like $20.00 USD. (I have several seasonings and ingredients on hand, so that's a rough estimate, but basically, I spend roughly what it would take to buy a 1 pound package for 3 pounds of delicious jerky. But wait, there's more:
The variations!
You can dry anything. Vegans, this is not only a meat drying contraption, you can also dry herbs and fruits by simply hanging or skewering. It also dries venison and virtually any other substance with moisture that you want to preserve.
But it's really designed for Beef Jerky. That said, there are thousands of variations to beef jerky. Millions of recipes on the internet. I have a clone recipe for Wild Bill's. The recipe I am using now is a modified version of the simplest recipe I use as a marinade base. I often marinade for 12-24 hours.
Simple basic beef jerky recipe:
5 lbs Meat.
20 oz. Soy Sauce
20 oz. Worcestershire Sauce
4 oz. Liquid Smoke
Marinade overnight and hang to dry. Wait 4-6 hours, then enjoy!
To that I added:
1 tsp Chili Powder
1/2 tsp Paprika
1 tsp Ground Ginger
2 tsp Ground Black Pepper
3 tbsp Garlic Powder
3/4 cup Pancake Syrup
1/2 cup Ketchup
Additions vary to the flavor you are trying to achieve, and I am calling this version "Mild Original".
I always try to cut my pieces cross grain, as it always better flavor absorption and keeps the jerky really tender. With those above ingredients, I marinaded for 10 hours, and this morning I put the batch in.
Does anyone else have any good jerky recipes to try? I've been hunting far and wide for the best recipe ever.
Got any dehydrating tips to share?
Comments welcome.
After researching the interwebs for the best commercial dehydrator, I started researching DIY dehydrators, again, an investment in tools and hardware. I then decided to build my own, as cheaply and easily as possible. Here's what I came up with. It's powered by a small 13x11 generic room heater, 800 watt power consumption, easily removed for other uses when the dehydrator is not in use:
My first version would dry jerky in 4-5 hours, and after MANY batches of jerky, I decided to make new version, with a few design changes. This model is 27" long, 15" wide, and 21" tall. Yes, it is made out of two cardboard boxes. It's lightweight, and highly portable. To make your own, you only need cardboard and 2" clear packing tape, and a sharp knife. No hammers or nails required. Version one of my dehydrator only held 14 skewers total, this model has 16, with a total capacity of 160-188 pieces of jerky, depending if you fit 10-18 pieces of whatever you are drying, and how you space it.
The lid slides back and forth, adjustable to whatever air flow you desire. The most important thing about drying foods and herbs is temperature regulation. You want the temp to stay in the 120-160 degree range, otherwise the food cooks, so ventilation is how you regulate temperature. With the lid cracked open this far, the temp stays at a constant 135 degrees F. I have a float able thermometer I also use for brewing my own beer, so it doubles as the temperature gauge, hung inside with a small piece of "s" curved coat hanger.
The hanging method of drying meat eliminates the need to touch or flip your pieces around so they dry evenly. Notice the even spacing between jerky pieces. This allow even air circulation, and the jerky dries uniformly from all sides. The skewers are simply straight 12 gauge wire, cut two inches over the width of the box. You load a skewer up, place the skewer inside from the top, fitting it in one side before the other, and then space your jerky accordingly. The batch I am doing now was 5 pounds of beef, which will dry out to about 3 pounds of dried jerky, so you can see I am still under capacity. I am using 13 of my 16 skewers, so I could've done a 6-7 pound batch easily.
Notice the Aluminum foil pan at the bottom. This simple innovation catches all the drippings, and when you are done drying a batch of jerky, you simply fold the foil inwards upon itself to contain any sticky goo, throw it away, and place a new foil sheet for the next batch. Virtually no clean-up! Of course I know you ATSers don't want to give up your tinfoil hats, but it's a necessary expense. You have to clean your skewers, and change foil. You put the box in a closet or on a shelf, and it sits until the next time you use it. How much easier is it than that? Oh, and the smell jerky makes while drying, Heavenly!
So let's crunch a few numbers. Commercial jerky is $16.99 USD as a rough estimate. I'm making about 3 pounds, so this batch would cost about $51.00 USD.
I spent $14.00 on meat, plus the ingredients, so my grocery bill was like $20.00 USD. (I have several seasonings and ingredients on hand, so that's a rough estimate, but basically, I spend roughly what it would take to buy a 1 pound package for 3 pounds of delicious jerky. But wait, there's more:
The variations!
You can dry anything. Vegans, this is not only a meat drying contraption, you can also dry herbs and fruits by simply hanging or skewering. It also dries venison and virtually any other substance with moisture that you want to preserve.
But it's really designed for Beef Jerky. That said, there are thousands of variations to beef jerky. Millions of recipes on the internet. I have a clone recipe for Wild Bill's. The recipe I am using now is a modified version of the simplest recipe I use as a marinade base. I often marinade for 12-24 hours.
Simple basic beef jerky recipe:
5 lbs Meat.
20 oz. Soy Sauce
20 oz. Worcestershire Sauce
4 oz. Liquid Smoke
Marinade overnight and hang to dry. Wait 4-6 hours, then enjoy!
To that I added:
1 tsp Chili Powder
1/2 tsp Paprika
1 tsp Ground Ginger
2 tsp Ground Black Pepper
3 tbsp Garlic Powder
3/4 cup Pancake Syrup
1/2 cup Ketchup
Additions vary to the flavor you are trying to achieve, and I am calling this version "Mild Original".
I always try to cut my pieces cross grain, as it always better flavor absorption and keeps the jerky really tender. With those above ingredients, I marinaded for 10 hours, and this morning I put the batch in.
Does anyone else have any good jerky recipes to try? I've been hunting far and wide for the best recipe ever.
Got any dehydrating tips to share?
Comments welcome.
Nice.
Inexpensive, easy to build and apparently effective. Thanks for sharing this, giving me ideas for my own.
Now I have to go kill some deer.
Inexpensive, easy to build and apparently effective. Thanks for sharing this, giving me ideas for my own.
Now I have to go kill some deer.
Super cool man.
I am totally inspired to make a version of this tomorrow!
I am totally inspired to make a version of this tomorrow!
WOW! Very cool. Even I can make that!
One question, well concern - I have one of those heaters, it gets pretty damn hot....any concern of fire with the boxes?
One question, well concern - I have one of those heaters, it gets pretty damn hot....any concern of fire with the boxes?
Originally posted by summer5
WOW! Very cool. Even I can make that!
One question, well concern - I have one of those heaters, it gets pretty damn hot....any concern of fire with the boxes?
Any modern heater has a thermal shut down built in, plus a tip sensor, which shuts them off. I paid like $19.00 USD at Wal-Mart for that one, a while ago, and it HAS shut down for thermal overload. My bad, too, because I had bumped the lid and shut off the air-flow. I can verify at least 4 times that has happened to me. Keep plenty of air flowing, and you wouldn't have a problem.
You also put it on a table, or out in the open somewhere while in use. I wouldn't recommend drying food in a closet. Air-flow is the key.
what if you lined the inside of the boxes with foil? maybe that will help cook it?
Very nice, but I'd use caution as the portable heater and cardboard could very well be a fire hazard.
reply to post by camaro68ss
I'd seen other designs doing that. I think it's an unnecessary step, as we don't want to cook the meat, just very slowly reduce moisture content. I keep the temp @ 140 F.
It never gets hot enough to combust. It's more of a slow drying heat, and no open flames. Pretty safe, though I'm sure the manufacturer wouldn't approve. I always keep mine out in the open, on a table, and there is always someone to watch it, and I don't leave it unattended. Safety is mostly common sense.
Originally posted by Druid42
reply to post by camaro68ss
I'd seen other designs doing that. I think it's an unnecessary step, as we don't want to cook the meat, just very slowly reduce moisture content. I keep the temp @ 140 F.
It never gets hot enough to combust. It's more of a slow drying heat, and no open flames. Pretty safe, though I'm sure the manufacturer wouldn't approve. I always keep mine out in the open, on a table, and there is always someone to watch it, and I don't leave it unattended. Safety is mostly common sense.
its a great cheap idea! i have to give you that.
And after 4 hours......
Jerky!

Your jerky is done when a piece bends and splinters like a twig, but doesn't break. Since I cross cut this batch, it is sooo soft and easy to chew! Delicious!
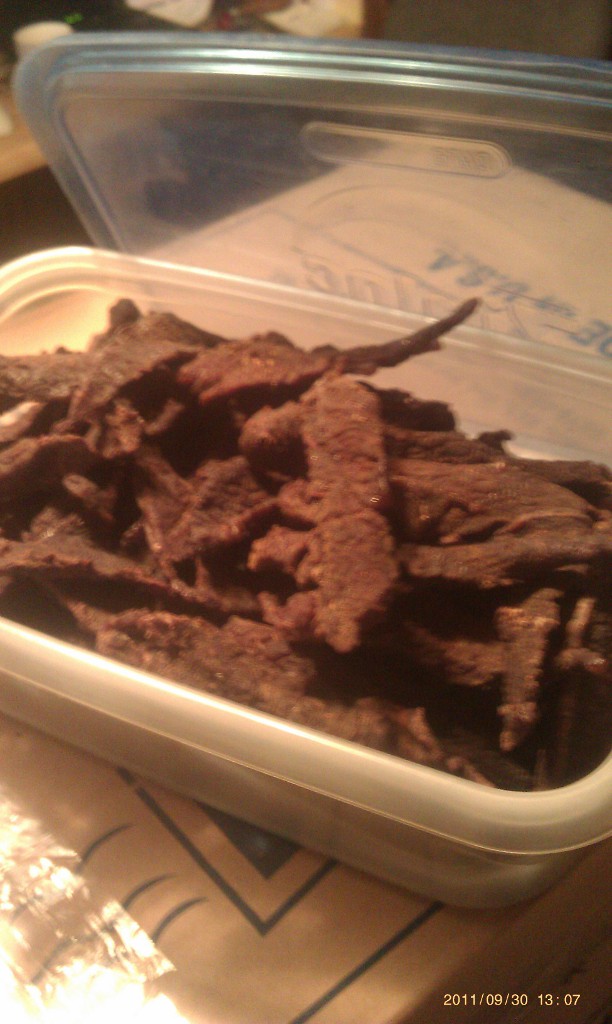
Thanks for all the comments.
Jerky!
Your jerky is done when a piece bends and splinters like a twig, but doesn't break. Since I cross cut this batch, it is sooo soft and easy to chew! Delicious!
Thanks for all the comments.
Great! I've been wondering how I could make one myself! I really appreciate this! Thanks for sharing it!
reply to post by Druid42
I use about the same ingredients but add the juice of a lemon or lime to tenderize and for hotter flavor use 1 tsp crushed red pepper.
I use about the same ingredients but add the juice of a lemon or lime to tenderize and for hotter flavor use 1 tsp crushed red pepper.
reply to post by GeoSorosReptilian
Yes, I usually use Lemon Juice as well, but I was trying to bring out a sweeter sticky flavor, and keep it mild. Oh, there have been times where I add in too many peppery ingredients. Not too spicy for me, but nobody else in the house could eat it, and they complained.
I push the limits of their tastebuds, sometimes, but this was a "normal" batch.
reply to post by Druid42
Awesome! S&F for you.
One question though..........most of those room heaters only have max settings B/W 85-90 degrees.
How did you get your 130-140 degrees and maintain it.
Again, very informative thread, thanks.
Parker
MTUBY
Awesome! S&F for you.
One question though..........most of those room heaters only have max settings B/W 85-90 degrees.
How did you get your 130-140 degrees and maintain it.
Again, very informative thread, thanks.
Parker
MTUBY
edit on 30-9-2011 by ParkerCramer because: (no reason given)
reply to post by ParkerCramer
That's 90 degrees into an open room, and once you put the heat into the collector/hanging chamber, the temperature multiplies rapidly. The hottest I've gotten it in trial runs is 180 degrees F, but that is undesirable because the meat starts cooking then. The temperature of 120 - 140 is easy to maintain, simply by sliding the lid open more or less. At the gap shown in the pics, temp held at 135. A little more open, and the temp falls proportional to the exhaust gap.
I calculate that I have 5,670 cubic inches of space to heat, not cubic feet. A thermometer and a little patience will help you calibrate your own unit, and you'll discover the proper air gap to use.
I'm leaving all the hard math out of the equation, calculating BTU's and such, after all, it is just a cardboard box.
edit on 9/30/11 by Druid42 because: added the box bit.
reply to post by Druid42
Thanks.
so, the damper (opening in box) is what you used to control the temp? awesome, thanks again.
Parker
MTUBY
Thanks.
so, the damper (opening in box) is what you used to control the temp? awesome, thanks again.
Parker
MTUBY
Hey Druid, Great Thread!!!
Can you please post a pic or to of the internals where you connect the boxes?
Also, do you seal around the heater inside the smaller box to prevent the air escaping?
I have been doing a lot of research lately on storing food items without electricity. I keep thinking that we as a people have forgotten how to do the most basic things that will be required to survive. I have been hitting Recycled Books here in Denton for OLD Famers Almanacs and the like. I wouldn't know even when to plant a seed yet alone how to grow it and store what it produced.
My only issue with the design is the need for power. I was thinking though... in a SHTF situation the power could be aquired through some "black ops". If solar panels can be added to electric cars to run the airconditioning without using the main batteries, I am sure one could be "aquired" and adapted to power some small items like your dehydrator.
Great stuff again, my friend!
reply to post by Druid42
Very innovative, thanks for sharing..
It reminded me of another method I have been meaning to try..
www.instructables.com...
Now I have two methods to see how they perform, I do have the regular dehydrator but you can only make so much at a time, I would much rather have a larger setup like you created
edit on Fri, 30 Sep 2011 15:47:44 -0500 by JacKatMtn because: (no reason given)
Thank you for the info.
I wanted to book mark this thread for further study.
S&F
I wanted to book mark this thread for further study.
S&F
new topics
-
Nephilim looked like clowns
Conspiracies in Religions: 2 hours ago -
Predator type cryptids
Cryptozoology: 2 hours ago -
Unbelievable BIG political crowd in N.Y.
2024 Elections: 9 hours ago -
Major National Cybersecurity Exercise on Election Day; What???
US Political Madness: 11 hours ago
top topics
-
Unbelievable BIG political crowd in N.Y.
2024 Elections: 9 hours ago, 26 flags -
Michelle Obama is angry, don't vote for the mean guy
US Political Madness: 17 hours ago, 19 flags -
Major National Cybersecurity Exercise on Election Day; What???
US Political Madness: 11 hours ago, 13 flags -
Labour MP Mike Amesbury Repeatedly Punches Man to the Ground
Politicians & People: 14 hours ago, 8 flags -
Nephilim looked like clowns
Conspiracies in Religions: 2 hours ago, 1 flags -
Predator type cryptids
Cryptozoology: 2 hours ago, 0 flags
active topics
-
Post A Funny (T&C Friendly) Pic Part IV: The LOL awakens!
General Chit Chat • 7694 • : Cymru -
Secrets of the Name of God & His Epithets (Titles) in the Holy Bible. Life Changing Stuff...
Conspiracies in Religions • 22 • : whereislogic -
The Acronym Game .. Pt.4
General Chit Chat • 826 • : FullHeathen -
Michelle Obama is angry, don't vote for the mean guy
US Political Madness • 26 • : AlexandrosOMegas -
Unbelievable BIG political crowd in N.Y.
2024 Elections • 37 • : Daughter2v2 -
Major National Cybersecurity Exercise on Election Day; What???
US Political Madness • 9 • : Daughter2v2 -
-@TH3WH17ERABB17- -Q- ---TIME TO SHOW THE WORLD--- -Part- --44--
Dissecting Disinformation • 3002 • : 777Vader -
Nephilim looked like clowns
Conspiracies in Religions • 0 • : berbofthegreen -
Predator type cryptids
Cryptozoology • 0 • : berbofthegreen -
Joe Rogan Experience #2219 - Donald Trump already has 12 million views....
2024 Elections • 32 • : WeMustCare